Fast Photo Selection
Published on Oct 25, 2025 (edits)
Jacques Lucke
Occasionally, I have lots of photos and want to select the best ones. Be it for a photo book or just to share them with family and friends. Recently, I started optimizing this process more because I wanted to create a family photo book and had ~20,000 photos to chose from.
Needless to say that making the selection process efficient was essential. Every tenth of a second per photo resulted in ~30 min more time spent overall. It’s important to me that I still look at all photos myself and don’t let an automated system do the decision for me.
My process changed a bit over time, but for that project I started using darktable and was quite happy with it. In this post, I want to briefly describe my current process. It’s fairly straight forward overall but might still some getting used to.
Step 1: Load images into darktable
Open darktable and use Add to library to import the source images. For demonstration purposes I created a bunch of images with random colors.
Step 2: Setup filter
By default, every image has a rating of one star for me. So my initial filter will be set to one star as well. This way all the images are visible initially.
After setting the filter, all images with a different number of stars will be hidden automatically.

Step 3: Full screen preview
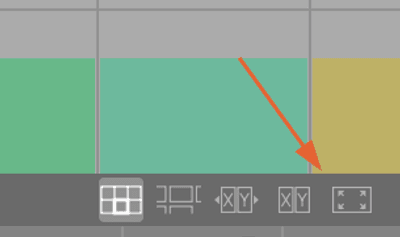
Select the first image and click the full preview layout icon. Alternatively, hover over the first image and press F. To go back, press F again.

Step 4: Use shortcuts to change image rating
Now a single image is visible at a time. The number of stars can be adjusted by pressing to corresponding number key. Additionally, R can be pressed to reject an image completely.
In this first stage, it’s best to just do a very rough selection. For me that usually means rejecting everything that’s out of focus or obviously not good for other reasons. In most cases, it takes less than a second to make this decision for any given image.
Specifically, I look at the image and press either R to reject or 2 to move the image into the next stage. In either case, the image will disappear because it does not match the filter anymore.
Undoing a mistake is possible with ctrl+Z or by temporarily changing the filter.
Step 5: Improve selection
The previous step just did a very rough selection very quickly. I generally, do one or two more passes over the remaining images until I’m left with just the good ones. Here, I also tend to look more often at neighboring images, because often there are multiple very similar images which are all good. In this case, I just keep the best one.
The general process is to first change the filter to two stars now. Then, I use the 3 key to move good images further, or use the 1 key to move the images back down.
Step 6: Further processing
What happens next depends on what further processing is done. Generally, one sets the filter to the highest given star count. Then either keep processing them in darktable or copy all the selected images to a new folder.
To copy the chosen images to a new folder, first select all of them and then use the Copy operation.
Note: This also makes darktable track the newly copied images. You’ll need to select/import the original images again if you want to change the filters. The operation also copies the .xmp files which can just be deleted if you don’t need them anymore.
Conclusion
This process allows me to quickly select the best images out of hundreds or thousands in a reasonable amount of time. It works for any kind image format supported by darktable including jpg, png and various raw file formats.
For further processing, I’m still switching back and forth between darktable and Rawtherapee.